We hope you love the products we recommend! Just so you know, Trendy Mami may collect a share of sales or other compensations from the links on this page.
–
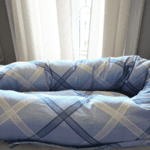
If you are expecting and in need of a pregnancy pillow, consider trying your hand at this super simple DIY pregnancy pillow. This DIY pregnancy pillow is a simple and eco-friendly alternative to buying your pregnancy pillow new, and it’ll be saving you tons of money! And with just a few simple extra steps, this homemade pregnancy pillow can double as a baby lounger as well, which will help save you even more money in the long run!
This DIY pregnancy pillow requires minimal materials and sewing skills, making it accessible for beginners. By repurposing old bed sheets and fabrics around the house, you can create a personalized pillow that meets your comfort needs! Additionally, this DIY project allows you to customize the size and shape of your pillow to suit your preferences. Plus, the ability to transform it into a baby lounger adds versatility and longevity to its use, making it a practical and sustainable choice for all expectant mothers!
Now let’s get to it.
How to Make a Pregnancy Pillow at Home
To start your pillow, here are the materials you will need:
- Old bed sheet
- Sleeping bag
- 1 recycled ribbon
- Scissors
- Sewing kit
- Sewing machine
For the baby lounger, you will also need:
- 8 big buttons
- 7 buttons (2cm)
If you’re more of a visual learner and prefer to follow along with a video tutorial, check out our step by step video guide for this DIY pregnancy pillow! The video tutorial provides detailed instructions, making it super easy to make your own homemade pregnancy pillow.
Step 1
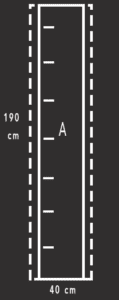
To begin, determine the length of your sleeping bag, as this measurement will be used for the pillowcase. Next, cut a strip from the bedsheet that is 40cm x 190cm, ensuring you leave some margin room as illustrated in the image. This strip, labeled as Stripe A, will be set aside for now. Note that the dotted lines on the image indicate the cutting line, while the seven dashes represent the placement for eyelets in a subsequent step.
Step 2
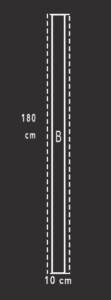
For the next piece of fabric, referred to as Stripe B, cut a width of 10cm and a length slightly less than the sleeping bag length determined in step 1, which in this case is 180cm. It’s important to leave a margin as indicated in the image to ensure the fabric can be properly secured. Stripe B will be used in a later step to create additional features for the pillowcase. Ensure the fabric is cut accurately and with care to achieve the desired result.
Step 3
In this step, you will prepare Stripe A for the drawstrings. Take Stripe A and fold the edges on the 40cm sides over by approximately 2 inches. Use pins to secure the folds in place temporarily. This folding creates a space along the edges where the drawstrings will be inserted later on. Ensure that the folds are even and secure, as they will serve as the channels for the drawstrings.
Step 4
Now, you will mark the locations for the eyelets along the length of Stripe A, which were indicated in step 1. Use a fabric marker or chalk to make these markings clearly visible. Once marked, proceed to sew the eyelets securely at each marked location. Ensure that the eyelets are evenly spaced and aligned along the edge of Stripe A. Sewing the eyelets will create the openings through which the drawstrings will pass, so take care to sew them neatly and securely.
Step 5
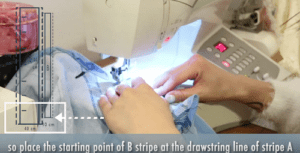
To proceed, take Stripe B and sew it to Stripe A along their longer edges. Ensure that the rear side or inside of the fabric is facing outward during this step. This will ensure that the seams are on the inside of the pillowcase when it is completed. It’s important to pay attention to the drawstrings on Stripe A to prevent them from getting caught or misplaced while sewing Stripe B. Align the starting point of Stripe B directly below the drawstring line on Stripe A, as shown in the instructions or video guide, to ensure proper placement and a neat finish.
Step 6
Now, it’s time to sew the drawstring line that you previously pinned on Stripe A. Ensure that the drawstring will be positioned above Stripe B once the sewing is complete. As you sew the drawstring line on Stripe A, continue onto Stripe B, sewing the edges over to create a finished hem. This will secure both stripes together and create a clean, polished look for the pillowcase. Take your time to sew accurately along the drawn line, maintaining a consistent stitch length. This step will help to keep the drawstring in place and prevent it from getting tangled or coming loose.
Step 7
Next, sew together the remaining two edges of both stripes to create a single, continuous piece. Ensure that the fabric’s inside is facing outwards during this step to allow for the seam to be on the inside once the pillowcase is turned right side out. This will create a neat and professional finish for the pillowcase. After sewing, carefully turn the pillowcase inside out to reveal the right side of the fabric. This step is essential for the final presentation of the pillowcase, ensuring that the seams are hidden and the finished product looks clean and well-made.

Step 8
To finish the drawstrings, take some old ribbon and thread it through each end of the pillowcase. You can use a safety pin attached to one end of the ribbon to help guide it through. Alternatively, if you don’t have ribbon, you can use an old shoestring or rope as a substitute. If none of these options are available, you can cut the bedsheet into strips of ribbon-like width to use. Ensure that the drawstrings are threaded through both ends of the pillowcase evenly to allow for easy opening and closing. Once the drawstrings are in place, tie the ends securely to prevent them from slipping out.
Step 9
For the final step, carefully roll up your sleeping bag to a size that will fit comfortably inside the pillowcase. Insert the rolled-up sleeping bag into the pillowcase lengthwise, ensuring it is positioned neatly and evenly. Once the sleeping bag is inside, gently pull the drawstrings at both ends of the pillowcase to close it securely. This will keep the sleeping bag in place and protect it during storage or transport. Check to make sure the drawstrings are tight enough to keep the pillowcase closed but not so tight that they damage the fabric or the sleeping bag. Your pillowcase with integrated sleeping bag storage is now ready for use!
Cozy DIY Pregnancy Pillow – Final Thoughts
Creating your own DIY pregnancy pillow is not only a budget-friendly alternative but also a sustainable choice that allows you to customize your comfort. By repurposing old fabrics and following a few simple steps, you can create a personalized pillow that meets your needs throughout your pregnancy and beyond. The added feature of transforming it into a baby lounger adds even more value and longevity to this DIY project, making it a practical and eco-conscious option for expectant mothers.
This DIY pregnancy pillow is accessible to beginners and requires minimal materials and sewing skills. Whether you’re looking to save money, reduce waste, or simply enjoy a creative project, making your own homemade pregnancy pillow is a rewarding experience. Plus, with the detailed instructions provided, you’ll have all the guidance you need to create a cozy and functional pillow that will support you during this special time in your life.
Already have your sewing machine out? Looking for another DIY? How about making some felt food for your kids! And check out our video here.