We hope you love the products we recommend! Just so you know, Trendy Mami may collect a share of sales or other compensations from the links on this page.
–
It doesn’t matter if it’s kindergarten, elementary school, high school or college, there’s nothing like the sense of satisfaction that comes across a parent’s heart whenever one of their children reaches a graduation milestone. Not only does it mean that their child has completed something, it also signifies that their son or daughter is getting older; that they are preparing to enter into a new season and stage of life. So help them enter the new stage of their life with a last little hoorah and DIY graduation decorations for your grads 2024 graduation party!
If you’re looking at a great brand for decor, take a look at Decocrated. While Decocrated isn’t specifically oriented towards graduation, many of the products that come in their subscription boxes can be used in unison with the items for your graduation party!
I diverge, but for all of these reasons (and so much more), it’s so important to celebrate graduations with good food, close family members and friends and even a decoration or two. If you’d like to take a stab at making some graduation decorations this year, we’ve got a few ideas that are almost as fun to make as they are to look at (once you’re finished).
On a side note, if you are a recent grad and no longer have any use for your textbooks, a great way to earn a little bit of extra cash is to sell your textbooks online at Textbook.com!
DIY a 2024 Graduation Party for Your Grad!
Just before we begin these DIY graduation decorations, go on over to Zazzle and check them out! You are sure to find awesome grad gifts you can personalize for you grad! Zazzle makes personalizing products easy and simple! Okay, now on to the DIY graduation decorations!
DIY Graduation Decorations: Shadow Box

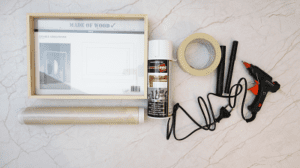
What You’ll Need:
- [easyazon_link identifier=”B07R15XSBK” locale=”US” tag=”twkmobile-20″]Double-sided frame[/easyazon_link]
- [easyazon_link identifier=”B000P9B9XI” locale=”US” tag=”twkmobile-20″]Gold aerosol spray[/easyazon_link]
- [easyazon_link identifier=”B07919HFL5″ locale=”US” tag=”twkmobile-20″]Other wrapping paper[/easyazon_link]
- [easyazon_link identifier=”B06X1CZWC5″ locale=”US” tag=”twkmobile-20″]Glue[/easyazon_link]
- [easyazon_link identifier=”B002YIP97K” locale=”US” tag=”twkmobile-20″]Scissors[/easyazon_link]
- [easyazon_link identifier=”B01178RVI2″ locale=”US” tag=”twkmobile-20″]Hot glue gun[/easyazon_link]
- [easyazon_link identifier=”B0014D5NVS” locale=”US” tag=”twkmobile-20″]Plastic wrap[/easyazon_link]
- [easyazon_link identifier=”B0013CQ20Q” locale=”US” tag=”twkmobile-20″]Black marker[/easyazon_link]
Planning a graduation party? Make it official with a few extra decorations from Kate Aspen!
Step One: First up, I color the double-sided frame (it’s best to go with a lightly-colored or wooden one) that I bought gold. I do this by using gold aerosol spray. I let the paint dry for about 30 minutes or so.
Step Two: I used a black marker to write a message onto the glass part of the frame (sometimes it’s easier to write the message on the wrapping paper of your choosing and then transfer it onto the frame by pressing the paper onto it). I only do this to the “front part” (the first part of the glass).
Step Three: Then I use glue to in order to stick the message onto the back side (the second glass) of the picture frame. (Make sure to remove any excess paper with a pair of scissors.)
Step Four: I use a hot glue gun in order to glue the sides of the picture frame to the bottom (I do this on the backside of the frame).
Step Five: I flip the frame over and put the message on the frame and the second piece of glass on top of it.
Step Six: Next, I cover the bottom two corners with some plastic wrap (like Saran Wrap). I put some hot glue on top of each side, let it cool and then remove it. What this will create are little transparent triangular stands so that the frame is able to sit upright.
Step Seven: Now the frame is ready to put money and small messages through the top slot of it. Cute.
DIY Graduation Decorations: Picture Frame
What You’ll Need:
- [easyazon_link identifier=”B0013JRFUA” locale=”US” tag=”twkmobile-20″]Cardboard[/easyazon_link]
- [easyazon_link identifier=”B01MSWKPKF” locale=”US” tag=”twkmobile-20″]Cutter[/easyazon_link]
- [easyazon_link identifier=”B014T4C58W” locale=”US” tag=”twkmobile-20″]Glue[/easyazon_link]
- [easyazon_link identifier=”B071KVW2WB” locale=”US” tag=”twkmobile-20″]Paper Tape[/easyazon_link]
- [easyazon_link identifier=”B002YIP97K” locale=”US” tag=”twkmobile-20″]Scissors[/easyazon_link]
- [easyazon_link identifier=”B000P9B9XI” locale=”US” tag=”twkmobile-20″]Gold aerosol[/easyazon_link]
- [easyazon_link identifier=”B07BGVMSQ8″ locale=”US” tag=”twkmobile-20″]Construction paper[/easyazon_link]
- [easyazon_link identifier=”B01DN8TPG0″ locale=”US” tag=”twkmobile-20″]Marker[/easyazon_link]
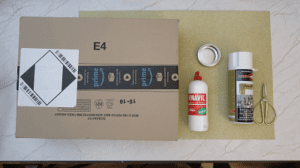
Step One: I use a few old cardboard boxes to cut some even strips (in order to make my frame).
Step Two: With some glue, I attach the ends of four strips together. Then I use some tape to make the sides extra secure (if needed).
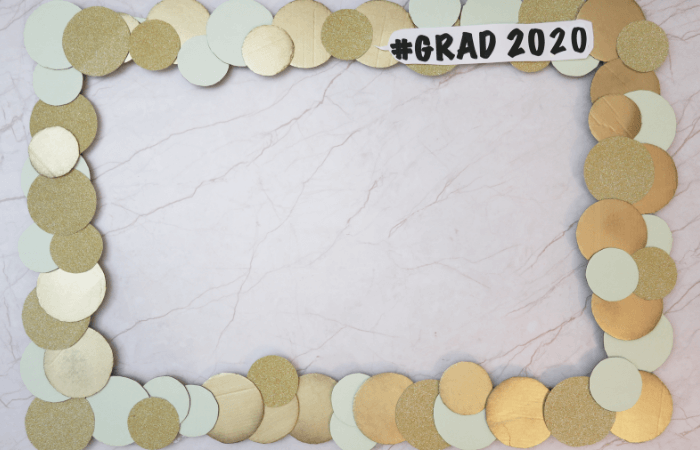
Step Three: With the remaining pieces of cardboard, I cut out different circle sizes. Some are brown, some are white. I like gold, so I personally make it a point to paint some of mine that (with gold aerosol spray), although you can certainly go with any color that you choose.
Step Four: I strategically place each circle where I want it to go and then I use to glue to attach each one to my cardboard frame.
Step Five: I finish this decoration off with a personalized message that I glue onto a side of the frame once the glue from the circles have dried. The perfect selfie picture frame that is sure to be a hit at your DIY graduation party.
DIY Graduation Decorations: Graduation Cap Jar
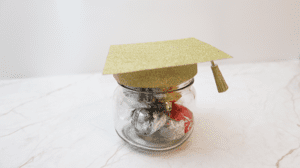
What You’ll Need:
- [easyazon_link identifier=”B01NBMPHYV” locale=”US” tag=”twkmobile-20″]Mason jar[/easyazon_link]
- [easyazon_link identifier=”B07BGVMSQ8″ locale=”US” tag=”twkmobile-20″]Glitter construction paper[/easyazon_link]
- [easyazon_link identifier=”B014T4C58W” locale=”US” tag=”twkmobile-20″]Glue[/easyazon_link]
- [easyazon_link identifier=”B002YIP97K” locale=”US” tag=”twkmobile-20″]Scissors[/easyazon_link]
- [easyazon_link identifier=”B06XF7VSV3″ locale=”US” tag=”twkmobile-20″]Candies or Chocolate[/easyazon_link]
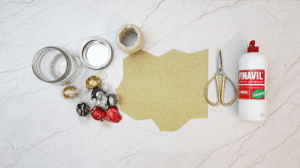
Step One: With some gold construction paper, I cut out the pieces that I’ll need for the graduation cap. The sizes need to be: 3, 5×3 and 5″ squares (for the cap); 2 and 5″ inch (for the fringe stripe) and a strip with same length of the lid board for the lid (just make sure that it’s a little bit taller than the lid).
Step Two: To make the tassel, I use the fringe piece of glitter paper and roll it up. Then, with a piece of twine, I tie a knot onto one end of it and glue it onto the tassel.
Step Three: Then, I take the square I have for the cap and the lid board (which has very small cuts along the length of it) and I use some glue to attach one side of the lid board to the other, in order to create a circle for the bottom of the graduation cap. Then I put the lid to the jar inside of the lid of the cap so that it can dry firmly.
Step Four: Finally, I put whatever sweets that I (or my graduate) wants into the jar, secure it with the lid and—voila! All done.
DIY Graduation Decorations: Cardboard Letters (CONGRATULATIONS)
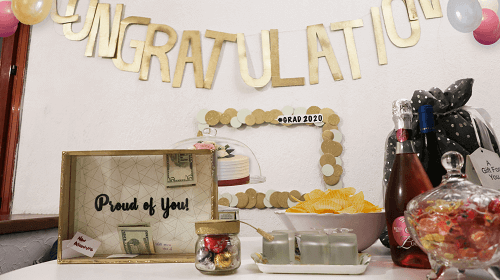
What You’ll Need:
- [easyazon_link identifier=”B00YGPZOQU” locale=”US” tag=”twkmobile-20″]Cardboard[/easyazon_link]
- [easyazon_link identifier=”B002C12EHM” locale=”US” tag=”twkmobile-20″]Cutter[/easyazon_link]
- [easyazon_link identifier=”B000P9B9XI” locale=”US” tag=”twkmobile-20″]Gold aerosol spray[/easyazon_link]
- [easyazon_link identifier=”B01178RVI2″ locale=”US” tag=”twkmobile-20″]Hot glue gun[/easyazon_link]
- [easyazon_link identifier=”B002YIP97K” locale=”US” tag=”twkmobile-20″]Scissors[/easyazon_link]
- [easyazon_link identifier=”B000ST1EW6″ locale=”US” tag=”twkmobile-20″]Twine[/easyazon_link]
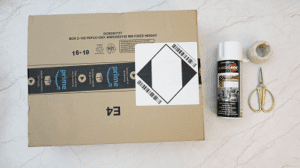
Step One: I use a different set of cardboard boxes in order to create some letters (make them as big as you’d like). Then I color them with some gold aerosol spray and let them dry completely.
Step Two: Next, I get some twine (white or transparent) and tie a few knots in it. The knots should be spaced out to where each one “fits” onto the back of a letter.
Step Three: With my hot glue gun, I attach each “knot”, let all of the knots dry (about 30 minutes) and now my letters are ready to hang up on a wall, in between two trees—wherever.
Lastly, if you’re up for a challenge you can even make this DIY congratulations banner a “congratulations grad” banner if you really want to make your grad feel special and if you have a few extra cardboard pieces left!
We hope this DIY Graduation Party is a success! Big congrats to you and yours!
Looking for some more grad ideas? Perhaps a gift? Check out these awesome graduation gifts your grad will surely love!


